Battlemoor Prep Part 1-Banners
With the Byers event over it is time to move on to Battlemoor prep.
So looking over the list I had started back at the first of the year it boiled down to
- Tent
- Bedding
- Clothing
- Banners
With the tent taken care of, bedding sorted and clothing being ignored as I am now clothing 2 additional people that left me with Banners.
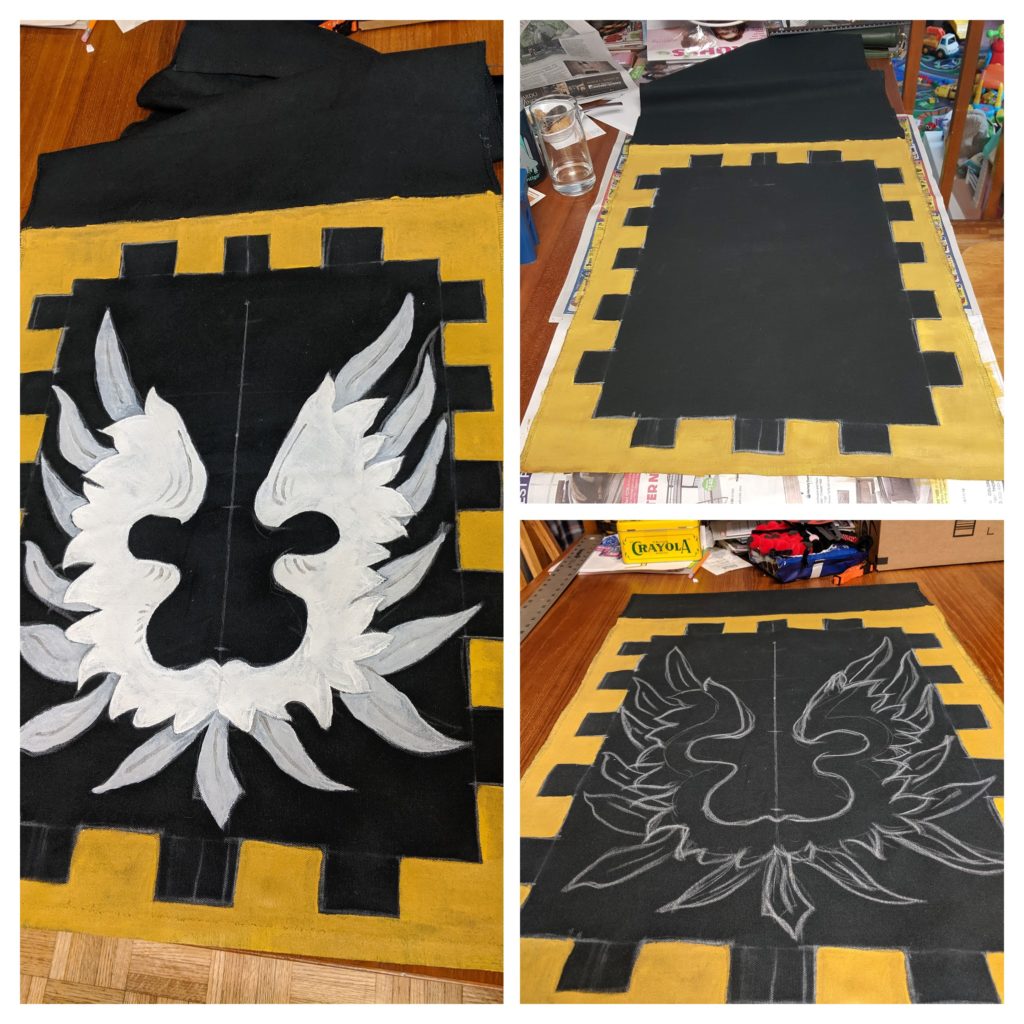
With silk banners being more work then I wanted to put forward until my device is ready I settled for a canvas banner with our Canton’s populace badge.
I had started it back in May with the hope I could take it to Byers but after an afternoon of painting the border and the weekends escaping me I set it aside until last night.
I ended up free handing the badge center and vowed, as I set the chalk down, never again.
The tutorial:
- 1/2 Yard of the canvas- I chose a black as I didn’t feel like painting white canvas black.
- Acrylic paints- I just used what we had around the house, but none of them were expensive.
- Paint Brush and cup for paint.
- Chalk and Ruler- to layout the design.
The first step was to wash the canvas. This allows the paint to take by washing out any chemicals on the fabric.
Once dry I folded it in half and ran a stitch down the top to make a pocket to add a dowel in later. You may also want to take the time to square up your fabric. Ironing the fabric is a good idea. (More so if you forgot about it in the dryer….)
From there I used the chalk to lay out the design. This was a process of math and looking at my reference photos. Not having a true square I had to fudge my corners. Keep a damp cloth on hand to rub out any stray chalk marks. OR if you plan to do this in one go, use a disappearing pen.
For my banner, I mixed gold and yellow and then white and silver. The trick here is to take your time and really work the paint in the fabric. and remember to watch Layering paint to make shadows and add depth is important. Also, step back and look at it from a few paces away. You may spend hours painting little dots and they will never read across the room.
Once it has dried using a pressing cloth and setting the iron on low gave it a quick press to help set the paint.
Tada! One banner painted and ready to display at an event near you!